

 03/30/2012 03/30/2012

Earthmen
Productions
© Dec-00-Mar-12
|
|
|
Updated:
July 17, 2013
Note: All pictures that follow are
"clickable". Clicking on them will show you an enlargement!
A lil' history ...
 This page describes a new way to make Printed Circuit Boards
(PCBs) with a laser
printer, water release paper and a hot laminating machine. I have read a
lot of information regarding the use of this type of paper and have devised a
method that will allow you to make perfect PCBs each and every time. I
have even made PCBs that use Surface Mount Devices (SMDs) with high success.
Practice, practice practice,... that's pretty much what it takes.
Hopefully these notes will speed up your success rate.
Parts & Tools List
...
 | Copper-clad circuit board material |
 | PCB drawing software (for developing the PCB traces/patterns for your
circuit) |
 | Laser printer with a resolution of 600 dpi or better ( or a quality laser
photo-copier). |
 |
Water release paper
(key component!) |
 |
Green TRF
Foil (toner resist enhancer) |
 | Hot laminating machine.
|
 | Etching Liquid (Ferric Chloride or Ammonium Persulfate)
|
 | Fine steel wool or non-steel scrubby.
|
 | Acetone (to remove foil and toner resist from board) |
 | (Optional: Aquarium heater to heat etchant, PCB holder, other tools,
etc...)
|
Printing, Fusing and Etching Instructions...

 |
FUSE THE PCB IMAGE ONTO THE COPPER
BOARD
 | The toner image on the paper will now be
"stuck" onto the PCB board. With the
application of heat for a period of time, along with slight and even pressure, the toner will
melt enough in order to stick (or "Fuse") to the copper board. This toner will
then become the etching resist,
not allowing the copper beneath it to be etched.
 | Place the paper on the bare PCB board, with the
printed toner side touching the cleaned copper board (again, be sure board
is very clean, with no finger prints what so ever). |
 | Using a laminator machine, pass them between the
rollers of the hot laminator (you can place the board and water-release
paper between two pieces of paper, such to act as a "carrier").
Allow the board to thoroughly cool, while avoiding touching of the paper that is now
stuck to the board. |
 | Carefully dip the board and paper in warm water and wait
until the paper automatically and completely releases (around 1-2 minutes).
Gently wash the board off of any
residual release glue (running water). (Note:
DO NOT pull off the paper what so ever... it
will eventually fall off itself) |
 | Pass the PCB in the laminating machine again, this time using Green
TRF Film on top of the toner/resist. This will seal the toner surface
with green foil resist, filling in any small imperfections. This will also make the
PCB circuit traces more impervious to the
etchant. (Note: This step
can be omitted, still with decent etching results... I prefer the foil
though). |
 | Examine the traces and using a magnifying glass
and
touch up any resist/trace imperfections with a fine tipped permanent magic
marker
|
 | Note: You could always use an ordinary
clothes iron too. Be sure to completely shut off all
steaming functions on the iron before using. The last thing you need
is for any water/steam to exit the iron as you are using it for this
application. Set iron on the "cotton"
setting and allow to fully heat up. Once heated, apply constant and even
pressure onto the paper which is placed on to the board. DO NOT
slide the iron over the board as
this might help smear the toner image, making traces smudge into each
other (short circuits). With an ordinary clothes iron, you might
have to repeatedly test until you determine the correct pressure and heat
setting. I highly recommend a hot laminator though.... I
have yet to have one board come out wrong!
|
|
|
 | ETCH THE PCB
(Note:
Wear old clothes and rubber gloves. One drop of etchant will ruin your
clothes, etc...). Also, be sure to perform this etching process in a
well ventilated area as fumes can be caustic and unhealthy.)
 | Etch the board
using either Ammonium Persulfate or Ferric Chloride (I use the latter).
|
 | Warming the solution helps speed the etching
process,
as does agitation of the PCB board in the etchant.
|
 | Occasionally observe the etching process by pulling
the board out of the etchant. When all
unneeded, exposed copper has been etched, rinse off the board with plenty
of water to stop the etching process (I often scrub the board too to ensure
the etching process has ceased). |
 | Dry
the board and then remove the toner
and foil with
acetone and/or very fine (#320+) sanding paper. |
 | I
also often "tin" my boards using a dipping tinning solution (see result
in picture below). |
 | Try
to avoid touching the PCB traces with your fingers as this oils/dirt will
make it difficult when soldering.


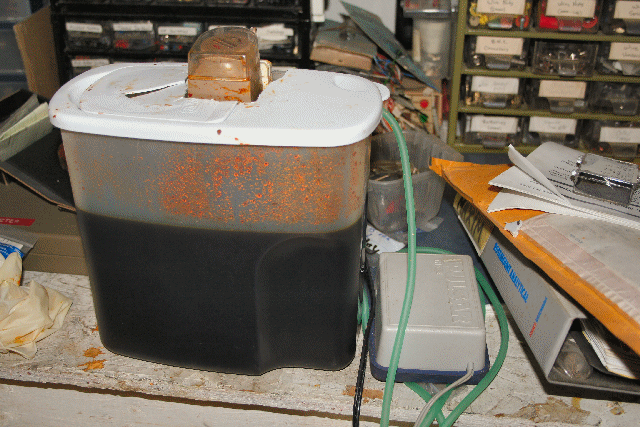
Note: As shown above, I built a couple of an etching tank using a plastic
container (originally for storing cereal), an aquarium heater and an
aquarium air pump. The air pump is connected to an aquarium aerator
(air hose connected to a porous stone which is placed in the bottom of the
tank) which produces bubbles in the etchant. These bubbles help etch
the board in no time (breaks surface tension between etchant and exposed copper
clad).
I simply hang the board in the tank, turn on the heater and pump and a few
minutes later I have an fully etched board.
Digikey
also sells a nice etching tank but for what you would pay for it
($150+), you could build 5 of them yourself for the same price!. |
|
 | DRILLING THE PCB
|
Testing & Operating Instructions...
I always use an ohmmeter to check all traces, particularly traces
that have the potential of being shorted (not etched enough) or being open
circuit (over etched).
I also often smear on a very thin layer of soldering
flux onto the traces prior to soldering. This helps the flow of solder,
eliminating the possibility of over-heating components when soldering.
SOLDER YOUR COMPONENTS AND TEST YOUR CIRCUIT !! YOU ARE DONE !
Additional Notes...
Summary of precautions:
 |
Clean bare PCB thoroughly (if you want, wash/scrub
it twice even !... I do!) |
 |
Buy the correct water-release paper and keep it dry
and clean during storage |
 |
Be sure to use a toner-based printer. Ink-jet
printers do not work! |
 |
When etching, use extreme caution
(gloves/ventilation) and properly store/dispose solution
*Funny (but serious) story... my girlfriend was cleaning up the kitchen one
day and she threw away a
pint bowl of Ferric Chloride I had used the night before to etch a few boards.
She actually thought it was chicken marinate, seeing I had grilled the night
before. YIKES! Lucky for me, she poured it down the drain with
plenty of water.... so she said! Lucky she didn't get any on her. We'll soon see if my plumbing pipes start
corroding!
Moral: STORE ETCHANT IS A SAFE LABELED CONTAINER AND DISPOSE OF
OR STORE PROPERLY AFTER EVERY USE!
|
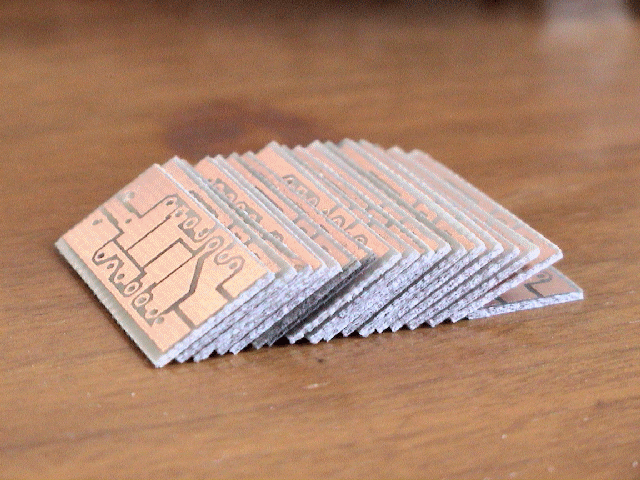
Below are a few examples of circuit boards I have
made in the past using this exact process:


Earthmen
Productions
© Dec-00-Mar-12 

|
|


